Posts

How to Get Rid of Whiteflies

Image
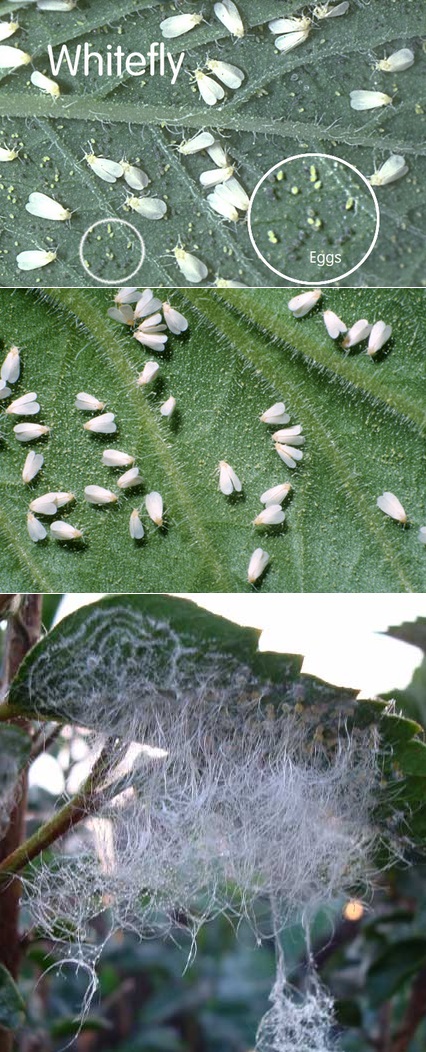
White flies are tiny, sap-sucking insects that are frequently abundant in vegetable and ornamental plantings. They excrete sticky honeydew and cause yellowing or death of leaves. The ability of the whitefly to carry and spread disease is the widest impact they have had on global food production. In the tropics and subtropics, whiteflies have become one of the most serious crop protection problems. Economic losses are estimated in the hundreds of millions of dollars. Soapy water : If you want to use something safer than pesticides, soapy water will work. I use it sometimes when I need to spot treat small infestations. - The problem with soapy water is I don't think it will kill all stages of white fly, only the adult stage. That means you will need to treat the plant about every three or four days for a couple weeks to kill the two or three generations you might have on your plant. Neem oil : You can use Neem oil . Be sure to spray the soil, that's where they lay the

Controlling Blossom Drop of Tomatoes

Image
Symptom : Tomato flowers fall off prematurely causing very little or no fruit to actually develop. Cause : "Blossom Drop" is usually caused when the tomato plant experiences a sudden change in the weather, typically when night temperatures are lower than 55 degrees F, when day temperatures are higher than 95 degrees F, or when night temperatures remain above 75 degrees F. Hot drying winds and a sudden lack of moisture for the plant may intensify the problem. Remedy : Add mulch to keep the soil moisture even. Use TOMATO BLOSSOM SET SPRAY , an all-natural plant hormone that helps blossoms set fruit in spite of poor weather conditions, producing larger, meatier tomatoes with fewer seeds. Use early in the season and get tomatoes up to three weeks earlier. When tomato flowers are fully open, spray regularly for bigger yields all season. Improving weather conditions may also solve the problem without action.

Why Tomato Plants Turn Yellow

Image
Symptom : Yellow, uncurled leaves begin to form at the bottom of the plant and make their way up. Cause : If the yellow leaves appear at the base of a tomato plant, it can be a sign of aging and that the plant may be beginning to die. It can also be caused by a nitrogen deficiency in the soil. On occasion, other factors may cause yellow leaves including pest, fungus and bacteria infestations. These three causes usually produce other symptoms besides plain, uncurled, yellow leaves at the base of the plant. For example, if the leaves are turning yellow or brown higher up on the plant, it may be a sign of early blight. Have your soil tested at a local nursery to confirm the nitrogen-deficiency diagnosis. Solution : If the soil have a nitrogen deficiency, supplementing the soil with well-rotted manure or compost, both of which are rich in nitrogen. You can also apply a nitrogen-rich fertilizer .

Blossom end rot on peppers

Image
Blossom-end rot is a serious disorder of pepper, tomato, and eggplant. Growers often are distressed to notice that a dry sunken decay has developed on the blossom end (opposite the stem) of many fruit, especially the first fruit of the season. This nonparasitic disorder can be very damaging, with losses of 50% or more in some years. Symptom : On peppers, the affected area appears tan, and is sometimes mistaken for sunscald, which is white. Secondary molds often colonize the affected area, resulting in a dark brown or black appearance. Blossom end rot also occurs on the sides of the pepper fruit near the blossom end. Cause : Blossom-end rot is not caused by a parasitic organism but is a physiologic disorder associated with a low concentration of calcium in the fruit. Calcium is required in relatively large concentrations for normal cell growth. When a rapidly growing fruit is deprived of necessary calcium, the tissues break down, leaving the characteristic dry, sunken lesion

Making a Garden Planter from Pallets

Image
You know you just love planting those summer gardens. Even if you don’t have a relatively large space for your garden, you can still plant your favorites this summer by making your own garden planter. This planter made from an old shipping pallet is great and it is very easy to make; not to mention cheap. Doing your own gardening is great. It gives you the opportunity to save money and to ensure that you are not feeding your family products that have chemicals in them. You can grow your own vegetables and ensure that they are completely free from pesticides and other harmful chemicals. You can use the pallet planter for vegetables, flowers, herbs or anything that you want to grow and it’s so easy to make that you can do several of them so that you have one available for every type of plant that you want to grow.

Beneficial Garden Insects

Image
Predators hunt, attack, and kill their prey. Encourage these natural enemies by avoiding pesticides that kill them; choosing plants that provide them pollen, nectar, and shelter; and keeping ants out of pest infested plants. common predators that eat garden pests are pictured below. Nabids or the damsel bugs: They are considered helpful species in agriculture because of their predation on many types of crop pests, such as cabbage worms, aphids, and lygus bugs. Green lacewings: They feed on pollen, nectar and honeydew supplemented with mites, aphids and other small arthropods. Lady Beetle or Coccinellidae: They feed on aphids or scale insects, which are pests in gardens, agricultural fields, orchards, and similar places. Mealybug Destroyer: Feeds on Mealy-bugs (Pseudococcus sp.) and other scale insects. Minute Pirate - Bug Orius spp Minute pirate bug or Anthocoridae: Pirate bugs feed on other small insects, spider mites and insect eggs. They cut a hole into their prey, pump saliva into

How to grow asparagus plants

Image
How To : • Choose a sunny part of the garden with good drainage. • Dig a trench and check the pH, which should be 6.5 to 7.5. • Plant the crowns about 8 in. deep and 15 in. apart. • Cover initially with 2 in. of dirt, and gradually fill the trench as the spears emerge. • The edible stems of asparagus rise directly from the ground. Spears that are about 8 in. tall are ready to harvest. • Snapping of the spear by hand is easy and protects the plant. You can use a knife, but be careful not to damage developing stems. • At the end of the harvest, allow the asparagus plants to form ferns. These help transfer energy to the roots for good spear development the next season From : vegetablegardener.com