Posts

Showing posts with the label backyard garden

How to Get Rid of Whiteflies

Image
White flies are tiny, sap-sucking insects that are frequently abundant in vegetable and ornamental plantings. They excrete sticky honeydew and cause yellowing or death of leaves. The ability of the whitefly to carry and spread disease is the widest impact they have had on global food production. In the tropics and subtropics, whiteflies have become one of the most serious crop protection problems. Economic losses are estimated in the hundreds of millions of dollars. Soapy water : If you want to use something safer than pesticides, soapy water will work. I use it sometimes when I need to spot treat small infestations. - The problem with soapy water is I don't think it will kill all stages of white fly, only the adult stage. That means you will need to treat the plant about every three or four days for a couple weeks to kill the two or three generations you might have on your plant. Neem oil : You can use Neem oil . Be sure to spray the soil, that's where they lay the...

Controlling Blossom Drop of Tomatoes

Image
Symptom : Tomato flowers fall off prematurely causing very little or no fruit to actually develop. Cause : "Blossom Drop" is usually caused when the tomato plant experiences a sudden change in the weather, typically when night temperatures are lower than 55 degrees F, when day temperatures are higher than 95 degrees F, or when night temperatures remain above 75 degrees F. Hot drying winds and a sudden lack of moisture for the plant may intensify the problem. Remedy : Add mulch to keep the soil moisture even. Use TOMATO BLOSSOM SET SPRAY , an all-natural plant hormone that helps blossoms set fruit in spite of poor weather conditions, producing larger, meatier tomatoes with fewer seeds. Use early in the season and get tomatoes up to three weeks earlier. When tomato flowers are fully open, spray regularly for bigger yields all season. Improving weather conditions may also solve the problem without action.

Why Tomato Plants Turn Yellow

Image
Symptom : Yellow, uncurled leaves begin to form at the bottom of the plant and make their way up. Cause : If the yellow leaves appear at the base of a tomato plant, it can be a sign of aging and that the plant may be beginning to die. It can also be caused by a nitrogen deficiency in the soil. On occasion, other factors may cause yellow leaves including pest, fungus and bacteria infestations. These three causes usually produce other symptoms besides plain, uncurled, yellow leaves at the base of the plant. For example, if the leaves are turning yellow or brown higher up on the plant, it may be a sign of early blight. Have your soil tested at a local nursery to confirm the nitrogen-deficiency diagnosis. Solution : If the soil have a nitrogen deficiency, supplementing the soil with well-rotted manure or compost, both of which are rich in nitrogen. You can also apply a nitrogen-rich fertilizer .

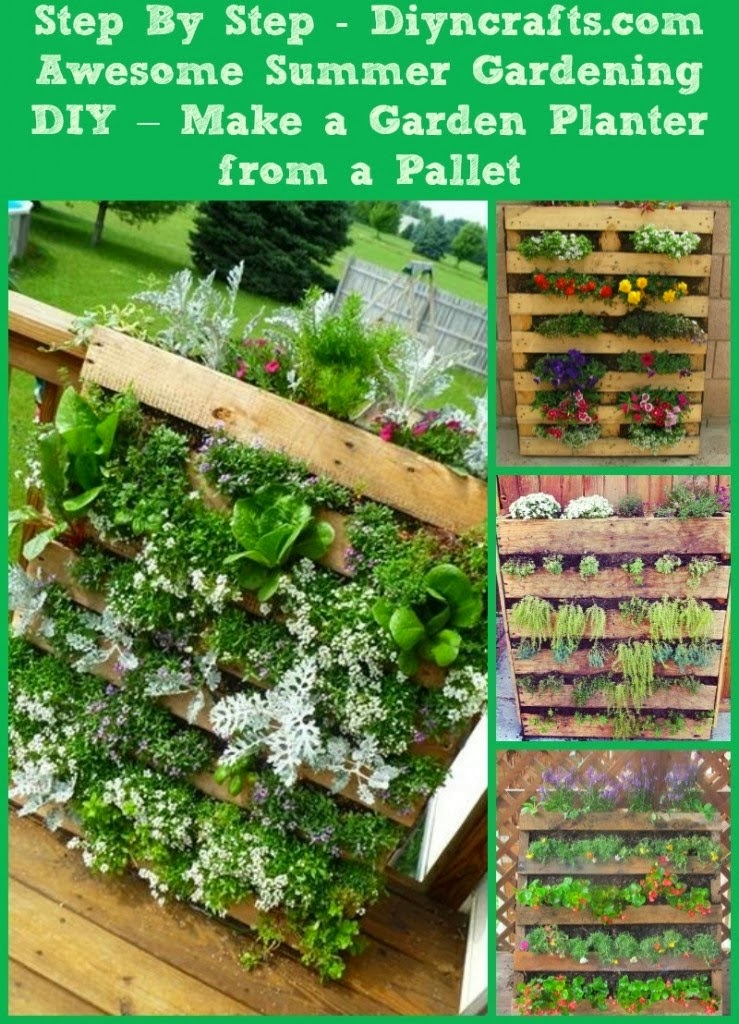
Making a Garden Planter from Pallets

Image
You know you just love planting those summer gardens. Even if you don’t have a relatively large space for your garden, you can still plant your favorites this summer by making your own garden planter. This planter made from an old shipping pallet is great and it is very easy to make; not to mention cheap. Doing your own gardening is great. It gives you the opportunity to save money and to ensure that you are not feeding your family products that have chemicals in them. You can grow your own vegetables and ensure that they are completely free from pesticides and other harmful chemicals. You can use the pallet planter for vegetables, flowers, herbs or anything that you want to grow and it’s so easy to make that you can do several of them so that you have one available for every type of plant that you want to grow.

Grow Hydrangea From Cutting

Image
Find hydrangeas and cut some small branches. I find my cuttings while running around the neighborhood. yes!! I steal hydrangeas cuttings from the neighbors. ;) First  Find a hydrangeas and cut some small branches. 2. Place your cuttings in water, at least for an hour. Then Cut the top and the top of each leave. 3. take a flower pot. And place a coffee filter inside the pot. This will prevent the soil from escaping and it will keep the soil moist. 4. Mix potting soil, manure and compose. I used 1/2 of potting soil, 1/4 of manure and 1/4 of compose. 5. Place the cutting in the pot. 6. Water those babies. My daughter love this part! 7. After the soil is moist use two sticks and place them in the pot. They have to be taller than the cutting. 8. Put the ziplock bag on top of the plant. Make sure to use a big enough bag and that the leaves or the plant aren't touching the bag. That is what the sticks are for! 9. Place them in a shaded area where thy don't receive direct sunlight. I ...

18 Common Garden Pests

Image
Let's face it - there isn't a gardener or farmer who hasn't come across one of these pests, while working in their organic garden. By finding out more about these insects and ways to control them, it is possible to grow healthy, abundant crops, and keep your garden healthy! Aphid : Aphids passively feed on sap of phloem vessels in plants, as do many of their fellow members of Hemiptera such as scale insects and cicadas. Once a phloem vessel is punctured, the sap, which is under high pressure, is forced into the aphid's food canal. Army worm : Its name is derived from its feeding habits. They will eat everything in an area and once the food supply is exhausted the entire "army" will move to the next available food source. Asparagus Beetles : After emerging from "overwintering," the beetles begin to eat the young shoots and tips of the asparagus plant. This usually occurs somewhere around early to mid-April, depending on the region's climate. Once...

Starting seeds is the inexpensive way to grow more of your favorite plants

Image
Starting plants from seed has many practical benefits: You save money, get a head start on the growing season, and choose from varieties far beyond those locally available. You also get to experience the joy of watching a seemingly lifeless seed sprout into a living plant. Read more at :  Seed-Starting Essentials

coloured Solar Fairy String Lights for Gardens

Image
This solar LED works by converting solar energy into electricity during the day, and it lights up automatically at dark. The volume of solar energy converted and stored everyday ,great and long lighting performance. Sealed process, with good waterproof performance. Suitable for indoor and outdoor decoration with trees, wreaths, etc. 100 LED lights STEADY and FLASH in a string, form a beautiful and fairy world. Buy it from AMAZON.COM

RainMaker Automatic Watering System

Image
The Flower House SOL-K12 Solar " RainMaker " Automatic Watering System is a one of a kind item! This solar powered unit waters your plants and herbs using only Sun power, no outlets to find, no plug-in to worry about, just set up, place the Solar "Rain Maker" in a sunny position near your water barrel or similar non-pressured water supply, insert the feeder tube into the water barrel and arrange the drip tubes as required to your plants, switch on the unit and that's it! The Solar RainMaker automatically waters every three hours, and the amount of water is adjusted by a simple dial. This unique Solar RainMaker is great for outdoor and indoor use, greenhouses, and gardens! Solar RainMaker kit contains, 1 - Solar RainMaker Pump Unit, 1- Anti Siphon Device, 1 - Inlet Filter, 12 - Drip Heads, 12 - Stakes, 12 - Tee fittings, 45' of Irrigation Tube. More info from AMAZON.COM

How to Harden Off Plants

Image
It's time to start moving your pampered seedlings outdoors. These seedlings are used to all the luxuries of life under lights or in a greenhouse: warmth, controlled light, regular water and feeding. As we've all had to learn, life on the outside isn't that pampered. To avoid sending your seedlings into transplant shock, you need to acclimate them slowly to the harsh realities of garden life by hardening them off. It only takes a few weeks, but it will keep your plants growing happy, rather than stunting them with a sudden chill. Read more: How to Harden Off Plants

Horsetail bamboo...must do this at my place

Image
Horsetail bamboo... saw this put in massive decorative pots around a swimming pool in Yogyakarta.. looked fab... must do this at my place...gotta get a pool first though:)

6 Things To Keep Bad Bugs Out Of Your Garden

Image
One of the best ways to control the insects and pests that damage the plants in your garden is by allowing helpful pests in that will drive those harmful ones away or eat them. 1. By planting inviting plants or “homes” for the helpful insects, you can keep the harmful ones at bay quite efficiently. Check with your local gardening center on which plants attract the good pests. 2. Another thing to keep in mind is to keep your garden clean. The harmful pests are often attracted to piles of leaves, grass cuttings and dense spots of weeds. These pests can thrive in those areas, so weed your garden regularly and clean up the leaves and grass cuttings that find their way into your garden. 3. Some organic gardeners use a hot pepper wax that they lightly spray on the leaves of their plants. The oils from the spicy contents of this wax wards off the harmful insects and other pests as well. 4. The wax solution is safe for your plants and doesn’t affect the produce at all, so don’t worry about “sp...

How to Make Mini Spiral Garden

Image
Making a mini spiral garden is really fun and can be used for gardening. You will not need a lot of time to do this, so taking about 8 minutes out of your time will help you start and finish this project. Have fun and be very creative.

DIY : Colorful Upcycled PVC Pipe Planter

Image
As part of a local recycling project, Barcelona, Spain industrial designer Fabian Andino of Espaibuenrollo reclaimed colorful but otherwise un-reusable and non-disposable PVC pipes, upcycling them into planters that can hang on walls or rest on specially-designed racks. But because it is PVC material, it will leach over time, suggest you put a pot inside before using.

Raised bed gardening layouts

Image
Raised bed gardening layouts

Make Room For Melons

Image
There is nothing like a vine ripened melon picked right from your own garden. Bite into a slice of sweet juicy watermelon on a hot July day, smell the aroma of a vine ripe muskmelon, or savor a sweet honeydew or specialty melon you grew yourself and it's love at first bite. Why Grow Your Own While melons are readily available in the grocery store there are many reasons to grow your own. Home growing allows you to try many new varieties and old heirlooms not available in the supermarket. Organic gardeners can avoid using any pesticides or synthetic fertilizers on their melons. Flavor is another reason to grow your own. While a muskmelon will continue to ripen after harvest, sugar content no longer increases after it is detached from the vine. Let's face it, for a melon to be put in a field truck, rolled down the belt of a packing house, boxed and trucked across the country it needs to be a little less ripe than one that need only be hand carried from the garden to the back porch...

How to choose The Right Fruit tree from your local nursery

Image
When choosing a tree from your local nursery, it's most important to look carefully at its features. Trees are commonly sold as 'bare root', meaning the roots are exposed, and the young tree is 3' to 6' tall. Here's what to look for: Strong, straight stem. Fruit trees do best when they grow straight. A slight lean in a young tree, if left unstaked, will develop into a large lean when mature and laden with fruit. The tree is susceptible to blowdown from wind, or can fall under its own unbalanced weight.  Defined leader. One central branch should be the obvious 'leader', which leads the growth straight up. A tree with no clear leader will require frequent pruning to keep the shape in balance.  Well balanced branches. Look for the 'candelabra' shape with branches extending evenly in all directions. This even growth will keep the tree balanced and growing straight, as well as maximizing fruit yield.  No low branches. Branches should be starting f...

How to Plant, Care & Harvest Lettuce

Image
This is a half-hardy vegetable that you can keep growing all season long by planting one small crop at a time. Days to maturity tend to be short. Garden lettuce is far superior, in both taste and vitamin A content, to supermarket brands. How to Plant: Lettuce is a cool-season crop that grows well in the spring and fall in most areas. Lettuce seedlings will even tolerate a light frost. Temperatures between 45 F and 65 F are ideal. Loose, fertile, sandy loam soils, well-supplied with organic matter are best. Soil should be well-drained, moist, but not soggy with a slightly acidic pH of 6.0 to 6.5. Since the seed is so small, a well-tilled seedbed is essential. Large clods will reduce germination. Start seeds indoors 4 to 6 weeks before last spring frost date for earliest crop. One week before setting seeds or transplants in the ground, till in compost or organic matter, especially if you have heavy soils. Harden off seedlings for about one week, and transplant outside between 2 weeks bef...

How to Make Fantastic Circular Fire Pit

Image
Fire pits are very much in demand during winter weather, and our client was no exception. Normally, my primary recommendation for clients interested in some old fashioned backyard heating are portable, steel-made pits. Read more about this tutorial at :  blog.designedforoutdoors.com

Winter sowing seeds outdoors in milk jugs

Image
How To : Make a Greenhouse. You can make a greenhouse from any container you like, so long as light can penetrate its walls. use a pen-knife to cut around the middle, almost all the way through. The uncut half-inch or so will serve as a hinge. Next, punch out drainage holes in the bottom. A Phillips screwdriver, heated over a flame at the stove, will facilitate the hole-punching job. Punch out also a few holes along the top portion of the container. These extra holes increase air-ventilation. Select the Right Soil. It is essential to use a soil mix that drains well. Pour the soil, preferably to a depth of 3 to 4 inches, into the bottom half of your container. Then moisten the soil thoroughly and let it drain. Sow the Seeds . Sow your seeds on the soil surface, and then cover them with more soil, when necessary, to achieve the proper planting depth. Then replace the lid, and secure it with a strip of duct tape, as illustrated. Bring the Greenhouse Outdoors. Your greenhouse, once planted...